Sunday, January 31, 2021

A Smocked Blessing Gown for Maggie


 When I went up to help mom and dad with Maggie after she was born, I asked them if they would like me to make her a smocked blessing gown.  They agreed, and I was so glad.

Unfortunately, other Christmas projects and a few unexpected sewing projects came up, along with difficulty getting the supplies I needed from my local heirloom sewing shop, and I found myself beginning the week after Christmas for a January 3rd blessing.  I discovered in the process that my eyes aren't as good as they were the last time I embarked on a smocking project, and that I was woefully out of practice.  I stitched at my daughter's over Christmas - at least as long as the light held.  I stitched on the plane on the way home, and at the USO while we waited half a day for our final flight.  New Year's Eve found me frantically embroidering the top and constructing the dress just hours before our drive to Atlanta the weekend of the blessing.

I improvised the smocking design, mostly because I found working from a pattern on an airplane fairly difficult, and because once I realize I had to have it finished in just a few hours, I needed to take a few shortcuts.  Fortunately, the dress construction fairly straightforward and it went together rather well.  I found the lace for the sleeves in my stash, thank goodness.

I planned to use lace for the hem, but didn't find any in my stash, and since I had forgotten to buy any, that was a problem.  Finally, my daughter who was visiting said, "Use rick-rack, Mom.  It's so sweet and innocent.  I love it."  I would probably never have considered it, but it worked well and ended up finishing the little dress nicely.

It was a pretty cold day for an outdoor baby blessing and a baby wearing a sleeveless cotton dress, but she looked beautiful, and I hope the dress will be an heirloom she can use for her own babies someday.

Saturday, January 30, 2021

Handmade Christmas: For My New Grandbaby


This is the last of the Handmade Christmas posts, and honestly these are things that I intended for baby shower gifts and didn't finish in time.  Perfect for Christmas gifts then, right?


Photo credit:  ebay, inc.

This is a baby sweater I have made several times, since I was a teenager, although it had been so long I wished my mom had still been around to answer my questions.  My mom made this pattern probably dozens of times, and I always thought its design was just such a sweet gift for a new baby.  I lost the pattern for many years, found it and lost it again, and then bought a new one on ebay.  The new pattern is an authentic vintage (1949) pattern and is falling apart, so I photocopied the pattern to save the booklet.

I guess you could call this a tradition of sorts, although I didn't make it for any of the other grandbabies.  Frankly, I just kind of forgot.  

The original pattern calls for a ribbon or crocheted drawstring at the neck, but I thought today's moms would see that as kind of dangerous, so I improvised a neck binding and binding down the front with a button.  It worked OK, but next time I might try a different approach.


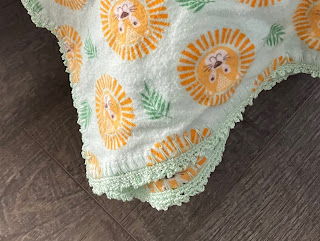
The other gift was a crochet-edged blanket.  I had actually finished a couple of these for her more-or-less on time, but this one didn't make it.  My grandmother made these for every baby in the family, and I have made bunches of these over the years.  I kind of overdid it with the first grandchild, in fact.  I probably made close to 20 of them.  My daughter finally said, "Enough!"  Guess I might have been a bit enthusiastic about this grandma thing.

 These little blankets are so inexpensive and work well as receiving blankets, swaddles, and burp cloths.  Truly a multi-purpose gift.


And, these blankets can actually be quite warm, which on this particular day was a very good thing.


Friday, January 29, 2021

Handmade Christmas: Moda Love Quilt


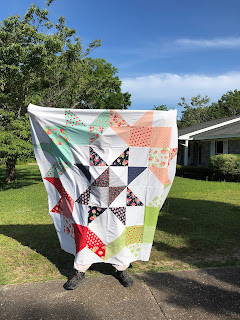
A couple of years ago when the Moda Love Quilt was super-popular on Instagram, I decided that I needed a quick quilt to play with.  It was during the school year, which always means I don't want to start a new, complicated project, but I needed some quilting therapy.  I grabbed this Bonnie and Camille layer cake that was sitting on the shelf (I don't remember which collection) and dug in.

Then sometime this past summer my son and his wife mentioned that they didn't have a quilt or bedspread for their guest bedroom in their new home.  Naturally, my first thought was, "I can fix this."  I had two large quilt tops already made, and let them choose.  They chose the B&C top.  I added some borders to make it 100" x 100" and sent it off to Sterling Quilt Co. to get it quilted.  I do most of my own quilting, but I was not about to attempt a king size quilt on my domestic machine.  That way lies madness!

Photo credit:  Sterling Quilt Co.

 Sterling got it back to me a couple of weeks before Christmas, and it is perfect.  I love the design we chose.  Every month, she does a penny design, and I really loved how this one almost echoed the design of the quilt.  I've had other quilts long-armed before, but none were as well done as this one.  The others had puckers at the edges and threads hanging.  Sterling buried all the threads and even trimmed the edges before she sent it back.  I was impressed.

Best of all, my son and his wife seemed to like their gift, even though it wasn't a great surprise. 

Thursday, January 28, 2021

Handmade Christmas: Tilda 9-blade Fan Quilt


The source for this photo is unknown.  If you message me, I will be glad to credit it to you.

Sometime last spring - in the middle of the mask-making madness - youngest daughter sent me this picture and asked if I could make this quilt.  I consulted my expert (oldest daughter) and she said it was a fan quilt and that she was pretty sure the fabric was Tilda.


The source for this photo is unknown.  If you message me, I will be glad to credit it to you.

As it happened, I had a F8 bundle of Tilda Lazy Days sitting on my shelf just waiting for its opportunity, so I set about planning this quilt.  I couldn't find a pattern I liked anywhere.  I knew exactly what I wanted it to look like, but I couldn't find anything even close.  Finally,  I headed to my LQS and bought a 10* fan template and a circle template, and set about constructing a quilt.  Even the instructions on the template were for a Christmas tree skirt, not a quilt block.  And although this sounds like it was a fairly quick, linear decision, this process took several months.  


I think one of the hardest things about using a pretty bundle of fabric all tied up with a label is just untying the ribbon.  But, eventually, I managed that task and set about using my template on all these fat eighths. I had j*u*s*t enough fabric to make the number of fan blades I needed.  Each F8 yielded 9 blades, which was just what I needed.  I alternated the fabrics - 5 in one block and 4 in another - so that each block was different from all the others.  


Once I got the blocks made, I set them on point and sewed them together.  I think I had 2 blocks left over. I cut filler blocks for the sides, top and bottom and sewed the rows together.

 And then a cool little miracle occurred.  I knew that I wanted a scalloped edge all the way around, but I had never done one before.  One day, I sat down with a couple of pieces of printer paper taped together and sketched the curve I wanted.  I cut it out with scissors, and then measured the length of the quilt sides and the top and bottom.  The curved piece I drew was exactly the right length to put 4 scallops top and bottom and 5 on each side.  I was crowing about this amazing success to my expert when she said, "Oh, I don't cut the scallops until I have the quilt quilted.  Otherwise, the edges get wonky."  

Oops.  Mine were already cut.  Then she said, "But I can tell you how to keep them from getting wonky," and she told me to zig-zag the edges before I did the rest of the quilting.  I always do zig-zag the edges of the quilt before I quilt it, but I was glad she told me.  

As it was, they were a bit wonky and I had to take out some of the zig-zag and a couple of seams, but I managed to get the scallops to lie flat in the end.  

For quilting, I stippled the negative space and outline-quilted the fan blades.  I echo quilted the scallops around the curves and along the straight edge until the two sets of stitching met, with only a bit of open space in the middle.  

Backed with minky, this is the coziest of quilts, perfect for snuggling on cold winter evenings.


Friday, January 22, 2021

Handmade Christmas: DIY Sleeping Bags for the Dollies


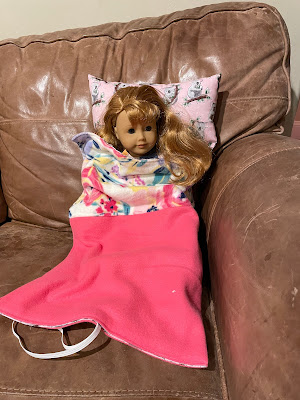
We are, apparently, an American Girl family.  All of the kiddos who are old enough have American Girl dolls.  While I was perusing the interwebs before Christmas, I saw a blog post by Kim Brancato where she showed how to make a dolly sleeping bag.  Since I had a lot of fleece scraps from the mermaid tails and the whale's tail, I thought it would be fun to make sleeping bags for each of the dollies.  

There are a number of patterns for dolly sleeping bags out there, but I liked this one especially because Kim used an elastic loop sewn into the bottom seam to roll up the bag.  Genius!  Some of my littles are not old enough yet to tie a bow - or even a knot, really - and the elastic loop allows them to roll up the bag all by themselves, and not have to continually pester a parent or older sibling.


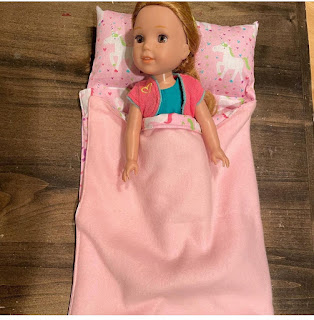
Kim's measurement for the 18" American Girl doll sleeping bag was 23" x 27", and it was perfect.  But two of my littles have Wellie Wishers dollies, and I knew that size sleeping bag would be too big for these 14-1/2" dolls.  I cut these dolly sleeping bags 18" x 24" and they were perfect.


The only change I made from Kim's tutorial was to attach the pillow to the sleeping bag.  This way, the pillow won't get lost, and dolly can always find her pillow, leading to fewer meltdowns from dolly's human friends.  The pillow then rolls up inside the sleeping bag and the elastic goes around the whole thing, making a nice, tidy bundle.  You may want to cut your elastic just a tad longer to allow for the pillow if you use this method

I tried several methods to attach the pillow, but I found that the easiest way (after making 3, I finally figured it out!) was to cut it with a 1" seam allowance at the bottom.  Sew a seam at 1" with an opening for the stuffing.  Then sew it closed.  Then sew the pillow inside the top seam of the sleeping bag at 1/2". This way, the stuffing doesn't get in the way while you're trying to stitch the bag together.  


Thursday, January 21, 2021

Handmade Christmas: Three Mermaid Tails and A Whale's Tail


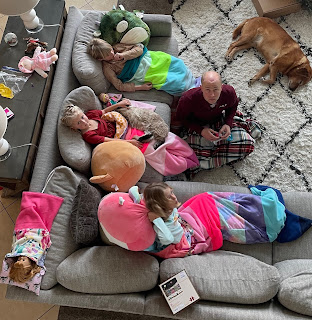
One of the biggest hits of Christmas for each of the kiddos were these mermaid tail/whale's tail blankets I made for each of the kiddos.  They seem to absolutely love them.  Apparently, they even sleep inside them in their beds under the blankets.  Who knew?

I saw the tutorial a few weeks before Christmas on the See Kate Sew blog.  I've been poking around her site at least since the Great Masking began in March, and I've made dozens of masks from her origami mask pattern.  I actually think I first saw the pattern for the mermaid tails on the SewCanShe blog but I couldn't find it again when I went looking.  

Kate's post said she made her pattern to fit her 5-year old, and since I have a 5-year old and a 4-year old in the family, I started there.  Joann's had fleece on sale 50% off, and I even found a number of remnants that were an additional 50% off.  For the 8-year old, I added an additional row of fleece, or about another 8 inches.

For the 11-year old, I added two additional rows, as she is quite tall.  

I added zippers to all of them because I didn't want any of them to have difficulty getting themselves out of their tails if the need arose, but honestly, I don't think any of the children ever used them.

Kate even had a baby size mermaid tail sleeper on her site that I just had to make for the littlest, although I didn't get it done until a couple of days after Christmas.  As you can tell, this was made from scraps from the other tails.  I made the 12-18 month size for my 2-month old granddaughter as she is so very long, but I might have overdone it just a touch.  She seems to be enjoying it, regardless.

And here are most of the kiddos watching a movie in their tails with their Squishimals (a gift from the other grandma) as pillows.  

As you can see, even the dollies got in the act.  More on the dolly sleeping bags tomorrow.